Search This Blog

Friday, November 29, 2013

Cake Central Winter Wedding Cake

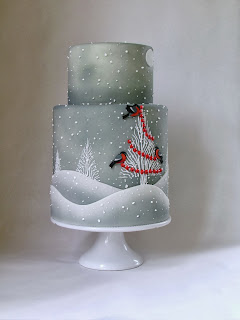
     A few months ago I was asked to submit a Christmas Wedding Cake to Cake Central Magazine , and was sent this pretty inspiration picture:


     To be honest my first thoughts were "Did they send me the right inspiration picture?". It is a lovely picture, but since almsot all of my cakes are weird, sculpted, and heavily pop-culture influenced I was a bit perplexed by this Martha Stewart Weddings style request. I do love cakes like this, but they are certainly out of my comfort zone as far as making them. I live in beat-up t-shirts and camoflauge pants, "pretty" usually isn't in my vocabulary :) But, what the hell, I am a weak human being and wanted to be able to say "hey, one of my cakes is in a magazine".

     Right off the bat I knew exactly how I wanted my cake to look, but was worried about execution. The last time I attempted covering a double barrel tier many tears were shed and f bombs dropped. This time I used the method in this tutorial found from  Party Cakes found here. It worked like a charm. I did have a seam, which I just hid in the back :)

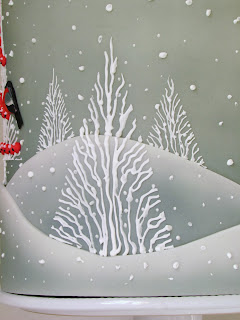
     My other worry was my shaky hands when doing detail work. I wanted the trees to have nice, sharp edges like the inspiration picture but wasn't sure how. Then it hit me, painter's tape! A great tool for working on fondant and gumpaste, I use the "delicate surfaces" kind. I trimmed the tape and applied it in the tree shape, piped my royal, then peeled the tape off right away, no problems!


For the cake itself I started with white fondant, and then airbrushed it grey. I rolled long strips of fondant for the hills, layered them on the cake and then airbrushed them as well. Then I used royal icing to make the trees and snow, and red berries. The birds and moon were painted gumpaste, adhered with royal. Here is the finished result






Saturday, March 30, 2013

Loads of Bunnies

With Easter coming tomorrow I spent all day yesterday making mini-bunny cakes for various little kids in my and my boyfriend's families. I also made a Grumpy Kitty Bunny just for my own amusement. I will post some behind the scenes pics later- but I am hoping to spend most of today making bunnies too- so just a little peak before I disappear down the rabbit hole (meaning my kitchen of course) for a few more hours :)


Thursday, January 3, 2013

"Dashing through the....No"

I haven't had the opportunity to make many cakes lately, so for my family's Christmas celebration I decided to bring a cake. And no ordinary cake, but Tardar Sauce the internet sensation Frumpy Kitty Cake:)

To start I printed off a picture of Tard the approximate size I wanted, and got a hunka hunka RKT. I wanted to be able to work in advance because of my work schedule so I decided to make the kitty himself out of RKT and place him on a cake. Since it was for Christmas I decided on a grumpy santa coming out of the chimney.
Once I carved out a shape that sort of resembled the grumpy cat's torso I gouged out some eyeholes and added some modeling chocolate details:

Then I covered it all with a thin layer of modeling chocolate to get a smooth surface:

Na, na, na, na, na, na, na, na, na, Bat Kitty"
While doing the eyeballs I had an idea for placing them. No matter how careful I am I always manage to distort my spheres when placing them, so I used the right size measuring spoon (dusted with a little cornstarch) to press them in place with no distortion!

Building up more layers with modeling chocolate: (the eyes I did with gumpaste so I could paint them better later)
Then the tricky part, I suck at covering weird shapes with fondant (who am I kidding I suck at normal cake shapes too- just have to know how to hide things:): I kept some plastic wrap over it while I smoothed to keep it from drying out to soon, looks kind of spooky:
Starting to see the details underneath:
Using gumpaste tools to further refine the features:

Added a gumpaste nose:

At this point I added an ear made of gumpaste, and stuffed it with wadded waxed paper until it was dry.


Then it was time for the chimney, coconut cake with chocolate ganache, looks a little lumpy, but I wasn't concerned with perfect edges for this one as it was going to be covered with textured "bricks" anyway:
For the bricks I used a cereal box cardboard template for the size, and then textured it with a grill scrubber:
Stuck to the ganache with a bit of water:
I used some brown and black food color to "age" my bricks, this was the first of several layers:

 It was the same sort of thing for the top grey bricks: marbled black modeling chocolate with white fondant, textured it with a stiff paintbrush:

 Then black food color for age; I could have sworn I took a picture of my mortaring, but I must not have. I tried a few ideas then finally settled on melted white chocolate textured with one of those crappy little plastic stiff paintbrushes, it set-up as you went, and started to powder like real mortar:


Now that the chimney was done I started painting Tard. To start I covered his eyes in painter's tape so I wouldn't over-airbrush onto them:
Layering browns and blacks, and pink for the nose and mouth area:
Pretty blue eyes:
Then I started the hand-painted details for fur and eyes:
Threw on a Santa hat of modeling chocolate:

I added some straws in the cake to support the weight of the RKT:


I was going to use fondant regularly for the snow, but on a whim I decided to use the microplane grater, with great results, For added snowy sparkle I sprinkled with a little disco dust on top, though it doesn't show in the photos


And voila! Grumpy Santa Kitty


Football Jersey Cake

Now I will admit I am not much of  a sports fan (except for hockey, and even then I just like the fighting). Oh sure I like going to sporting events, because they serve beer, but the actual games and players, meh. I don't hate it, I just could care less. Unless there is taco dip being served, then I will go to whatever football/baseball/curling viewing party you have. Anyway, this rambling preceeds me talking about a cake I did a month or two ago of a Packer jersey. I started off with a quarter sheet, which I filled and stacked.
Because I didn't want the hassle of making and cutting extra cake, I decided to go with rice cereal treats for the collar and sleeves. You can't really tell in the picture, but one thing I made sure to do was taper the ends of the sleeves, which I prefer to the cakes where every element is at the same height/level. Any contrast , to me, adds a little more character to the cake

Then I covered everything in a white chocolate ganache.
The sleeves and collar were still a little too bumpy because of the RKT, so I added a thin layer of modeling chocolate over those areas so the final fondant layer would be nice and smooth.
Then I covered the entire thing with fondant, using gumpaste tools to indent lines for the hems. I also ran a pastry stitching wheel in the indents to make it look a little bit like sewn hems.
The first layer of green airbrush.
And another.
Adding some brown for more depth:

Then I made templates for the numbers using cereal boxes (I like to use them printed side down as they are glossy and mostly non-stick).
I cut them out of the gumpaste, then moved them carefully to the Wilton cake lifter, and let them sit a few minutes so they would be less likely to move/distort:
I used rulers laid out to make sure I was centering the numbers correctly-laying the paper templates I had made to get the positioning right. When doing a deceptively simple cake like this, it is even more important to get everything as close to perfect as you can:
I used my x-acto to score around the paper as a guide for when I would lay the actual gumpaste on:
Same sort of deal for the name- I pieced together the name I was using and used a paper printout to get the right spacing:
Then I added stripes on the neck and sleeves, hand-painted the yellow, then added some layers of brown airbrush for depth:
Adding more darks/shadows with brown and black airbrush color:


And there you go:)